While it may seem that the days of writing checks has been replaced by technology, checks are still an integral part of managing finances. It’s still very important to understand the different parts of a check so you can read and write them. Here is your guide to help you learn the different parts of a check:
Parts of a Check:
-
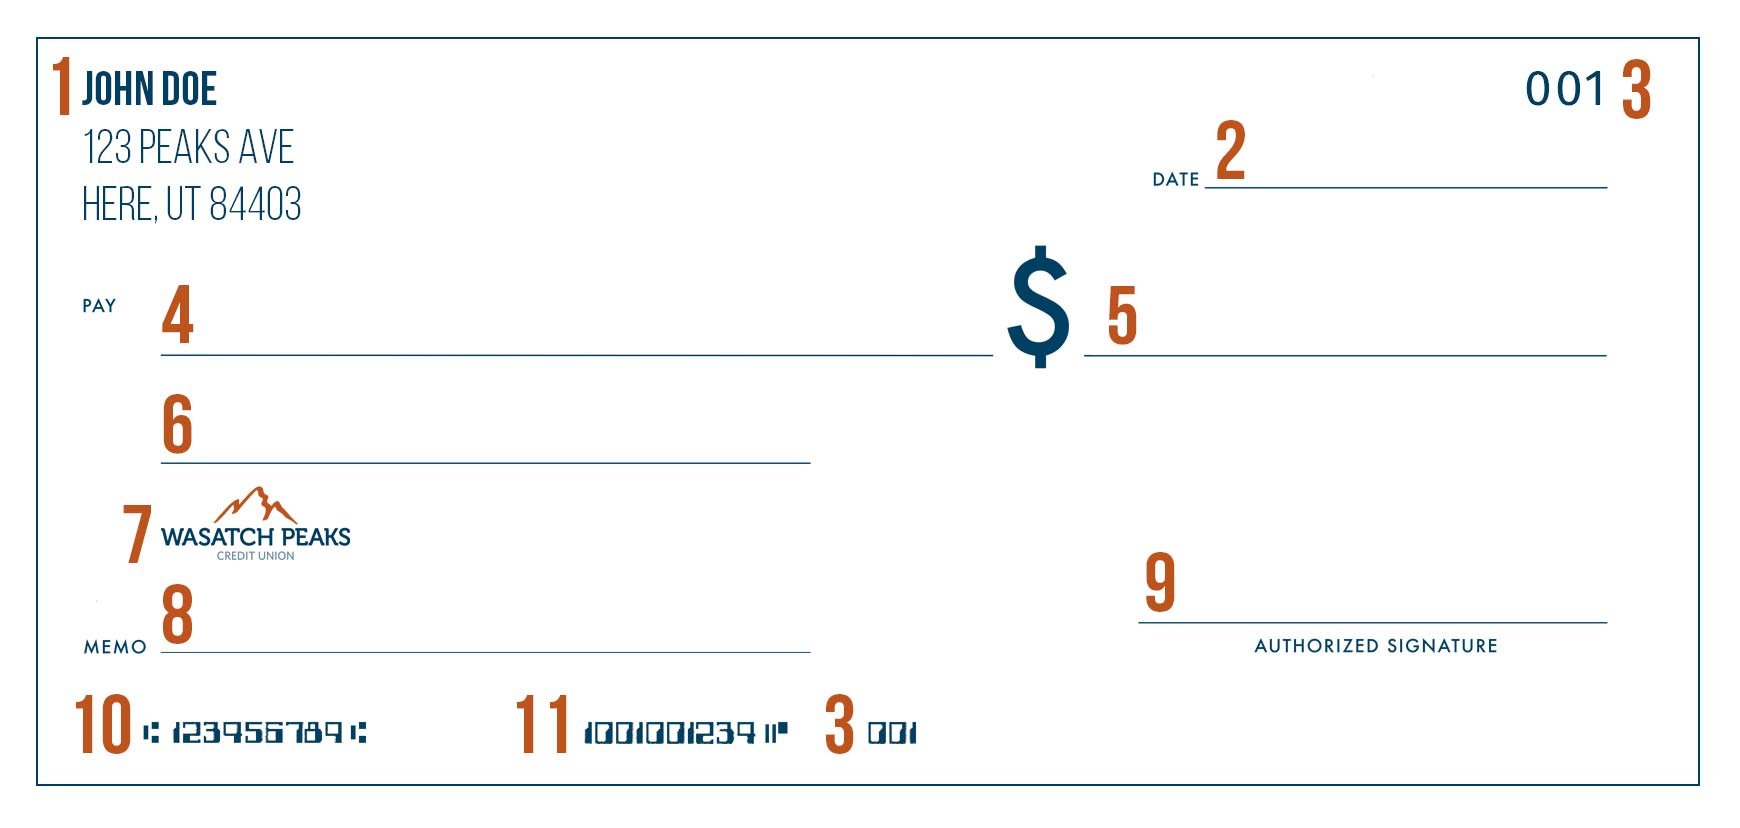
Your Personal Info
This part of the check displays the information of the account owner who is the one paying the funds through the check. This is located on the upper left-hand corner of the check and will typically include your name, address, and phone number. -
Date
This space is provided for you to fill in the date of the check. Usually, this will be the date on which you write the check. You can also postdate the check for the future; however, this may not always be honored and is depending on the financial institution’s policies. -
Check Number
The check number is listed in the top right-hand corner of the check and can also be found on the bottom of the check with the routing and account numbers. This enables both you and the financial institution to reference the specific check for tracking. -
Payee Line
This is where you will specify who is receiving the funds from the check. Only the payee listed on the check is eligible to utilize the check and can be an individual or an organization. -
Dollar Box
This box is where you write out the check amount in a numeric format. Be sure to fill the space and include a decimal, even if the check amount is a round number. -
Amount Written
This part of the check is where you write out the check amount in words. The full dollar amounts are written out normally, while the cents are written as a fraction with the number of cents/100. It is recommended to strike any unused space on this line out with a line. -
Financial Institution Information
This includes the information on your financial institution where the funds for the check will come from. Checks vary by bank, so in addition to the name of the business, this portion may include information like their address, phone number, or logo. -
Memo Line
This portion is optional but can be used to make notes for your records or a note to the recipient of the check. -
Signature Line
This is where you’ll sign your check, authorizing it to be used. This is on the bottom right corner of the check and it a security feature against fraud. -
ABA Routing Number
The ABA routing number across the bottom of the check is the routing number of your financial institution. This is used to contact your bank or credit union and collect the funds by the institution where the check is deposited. -
Account Number
The account number is also on the bottom of your check, to the right of the routing number. This specifies which account is yours so the funds can be retrieved. -
Endorsements
Before a check can be deposited, it needs to be signed by the recipient on the back of the check. There are several ways that you can sign a check and many banks and credit unions will have their own endorsement requirements when you deposit a check with them.
Learn more about checking accounts and how much you should keep in your checking account by visiting our helpful guide.